Microsoft created PowerShell 7, an open-source, cross-platform scripting language and command-line shell. It is designed to automate tasks and manage system configurations for system administrators and power users, and it is built on the.NET Core framework. By default, Windows comes pre-installed with an older version of PowerShell. In our system, Windows PowerShell 7 can be installed individually. You will still have the older one on your system. We will learn how to install PowerShell 7 by following this guide.
Table of Content
What is the procedure to Install PowerShell 7?
When installing PowerShell 7 on Windows, there are three ways to go about it. Let’s examine each of these choices so you can determine which one best fit your needs.
Option 1: Download the Microsoft Store PowerShell 7 app.
Option 2: Download and install PowerShell 7 using Winget.
Option 3: To install PowerShell 7 on Windows, download the MSI package.
Thus, we will investigate each technique individually. You can select the one that is most convenient and appropriate for you.
Method 1: Download the Microsoft Store PowerShell 7 app.
Getting the software from the Microsoft Store is the simplest method to install PowerShell 7.
- Go to Microsoft Store App.
- Search
- Press on Get

After the PowerShell 7 app has finished downloading to your windows computer, you can use it.
Method 2: Download and install PowerShell 7 using Winget.
It is advised to download and install the most recent version of PowerShell 7 using Winget. Version 1709 or later of Windows 10 and Windows 11 support the command-line usefulness Winget. You can download, install, or update Windows applications with this tool.
- Launch PowerShell as administrator, then type the following command.
winget install Microsoft.PowerShell
- It will download and install PowerShell 7’s most recent version.
- Wait until Windows configures PowerShell 7.
The result will seem like this.
PS C:\> winget install Microsoft.PowerShellFound PowerShell [Microsoft.PowerShell] Version 7.3.1.0This application is licensed to you by its owner.Microsoft is not responsible for, nor does it grant any licenses to, third-party packages.Downloading https://github.com/PowerShell/PowerShell/releases/download/v7.3.1/PowerShell-7.3.1-win-x64.msi  ██████████████████████████████   101 MB /  101 MBSuccessfully verified installer hashStarting package install...Successfully installed
PowerShell 7 has been successfully installed and is now working.
Use the next option if the Winget command-line is not supported by your Windows operating system.
Method 3: To install PowerShell 7 on Windows, download the MSI package.
Installing Windows PowerShell via this alternative method is also possible. You can select the version that you require. Choose the stable version whenever possible rather than the beta or testing versions.
For information on how to download and install the MSI package, visit Microsoft Documentation. You can download the previous versions from the Github PowerShell Releases page and install them.
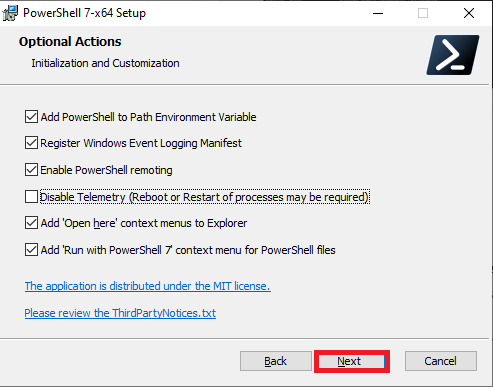
- Launch the MSI file to install PowerShell after it has been downloaded.
- Select the suggested options and press the “Next” button.

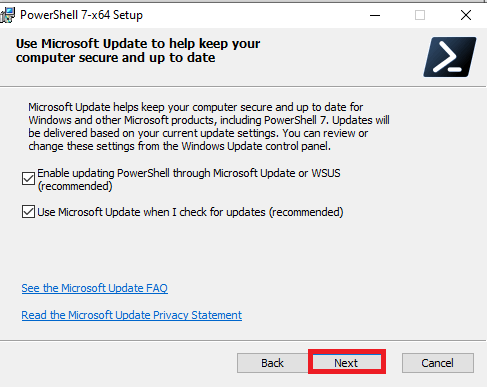
- Click next after turning on updates to receive future updates automatically.

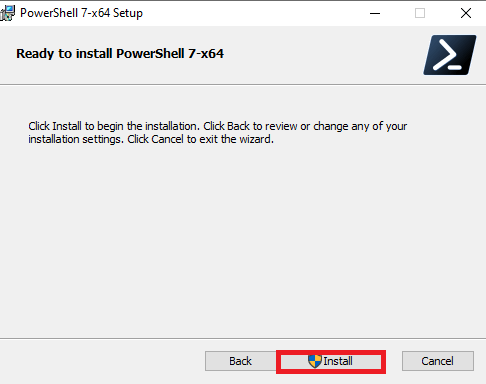
- To install Windows PowerShell, click the Install button now.

Once installed, you can use it by searching for it in the Windows search bar.
Wrap-Up
There are three methods that you learned to download and install PowerShell 7 on Windows. The quickest methods are to use the Winget PowerShell command-line tool or download the PowerShell app from the Microsoft Store. Another option is to download PowerShell 7 setup and install it on a Windows computer; however, this method requires more time due to the setup wizard.
Read More: Delay Delivery in Outlook Emails
OneDrive to OneDrive Migration

